Food 101: How To Make A Roast Chicken
Everyone likes chicken. That’s a fact of life. Even vegetarians like chicken, they’re just morally opposed the consumption of it (and even then it seems like most will admit chicken is the least morally objectionable of meats to consume). As far as I can tell there’s no religions specifically forbidding its consumption either. So yeah, chicken is like totally the best. And there’s a billion different ways to prepare it. We’ve talked about at least a hundred and fifty thousand of those ways, but today we’re gonna go back to where it all began and discuss the classic, basic dish of a simple roast chicken.

One of the best parts about making a whole roast chicken is just how much food you get out of it. An entire chicken, plus the vegetables you cook with it, is probably enough food to serve at least four or five people for one dinner, especially when you make a side dish for it. On top of that, it’s convenient in that you’re getting a good, nutritious meal in one pan with your chicken being filling protein, and a serving of veggies providing fiber and nutrients. Like curry and other one-pot dishes, it’s a very easy meal that requires little other food to supplement it. The only downfall is that it does take a fairly long time to roast a chicken, compared to lightning fast dishes like grilling. Fortunately most of the time it takes to make it is just waiting, with little active input from your part. One special bonus is that this entire time that it’s cooking, your house will fill up with the delectable aroma of your roast, possibly bringing back cherished childhood memories, or just making you really impatient and hungry.
Basic Roast Chicken Recipe
- 1 whole chicken
- Olive oil
- Approx. 1/2 cup lemon juice
- Salt
- Pepper
- Garlic powder
- Seasoning blend such as herbes de provence, tuscan seasoning, etc… (optional, or substitute dried parsley + oregano + thyme)
- Paprika
- 1 sprig/bundle of fresh rosemary or sage
- 2-4 tbsp butter
- 2 medium potatoes, sliced thin (optional)
- 2 large carrots, sliced into chunk (optional)
- 1 onion, sliced into chunks (optional)
- 1 cup chicken stock or water (reserved; you may not need it)
Before Cooking
Start off by pre-heating your oven to 375ºF. Get yourself a large baking pan, large enough to accommodate the whole chicken, with several inches of space to spare on all sides.
Take the chicken, unopened, and place it in the sink. Cut the package open and let the juices drain out into your sink. Now, let me preface this by saying that the USDA recommends that you do not rinse off raw chicken in the sink, because it can transmit pathogens to your sink from the raw meat. Let me also say that I think the USDA is kind of full of shit with that recommendation.
First off, raw poultry is gross. The juice and blood that basically envelops it inside the package grows stagnant rather quickly, so even refrigerated chicken that is perfectly good to use and freshly sold can have a bit of an unpleasant smell to it. That nasty, dead-bird-juice is only going to detract from the taste of your chicken later, so you want to get rid of it.
Secondly, yes you absolutely will contaminate your sink with pathogens doing this, WHICH IS WHY YOU CLEAN IT AFTER. Seriously USDA, it’s not rocket science. I don’t think I’m too far-off on this one, call me crazy, but I imagine most people don’t eat food out of their sink. So yeah. Either spray your sink down with bleach or clean-up spray after, or wipe it with clean wipes, and you’ll be fine. I’ve never had salmonella after years of doing this, so you shouldn’t worry.
tl;dr version: Cut open your chicken package in the sink and then rinse the chicken off.
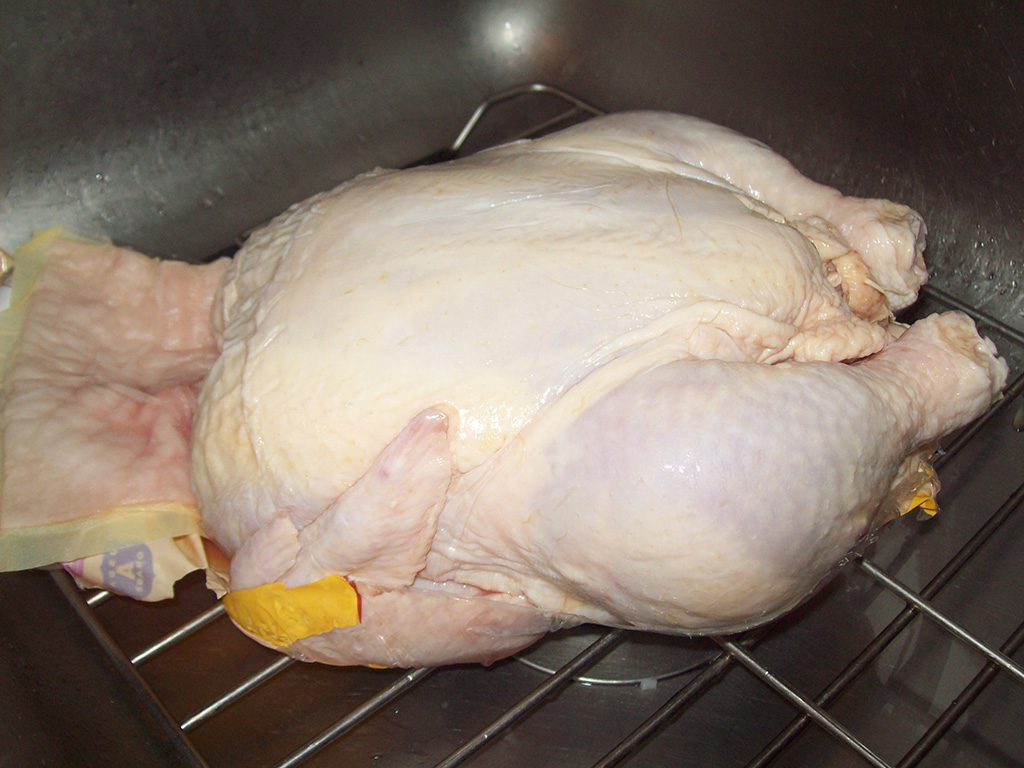
In addition to rinsing it, you’re gonna need to remove all the giblets packed inside the cavity chicken. For the uninitiated, giblets are basically all the random odds and ends and organs that nobody likes to eat. As a hilarious and barbaric, practical joke, poultry companies cram all these organs into the hollowed out ass of the dead chicken in question. I mean, some people use them for soups and stuff, but if that’s not your style, just discard them. After you chicken is cleaned off, place it in your pan, breast-side down. You’re going to begin seasoning it on its back, then flip it over to repeat the same process on the top of it.
The Seasoning
Seasoning a roast chicken is hard to really describe in words because it’s such a freeform activity. I know everybody really enjoys measurements in their recipes, but sometimes you just gotta go balls to the wall and eyeball it. I like to preach that someday cooking will become so second-nature to you that you don’t have to measure anymore, as you see with most professional chefs. So consider roast chicken a practice activity for working your way up to that level, some day.

The guideline I’m gonna give you is that when seasoning your chicken, sprinkle every ingredient generously but not to the point it actually forms piles on the chicken. When you consider how large a whole chicken is compared to, say, chicken cutlets or pork chops, you’ll realize that you need a pretty decent amount of spices.
To start, drizzle olive oil all over the chicken, and then do the same with your lemon juice as well (remember, we’re doing top and bottom, so using about 1/4 cup on each side). After this, sprinkle the salt on, and then grind some fresh pepper all over.
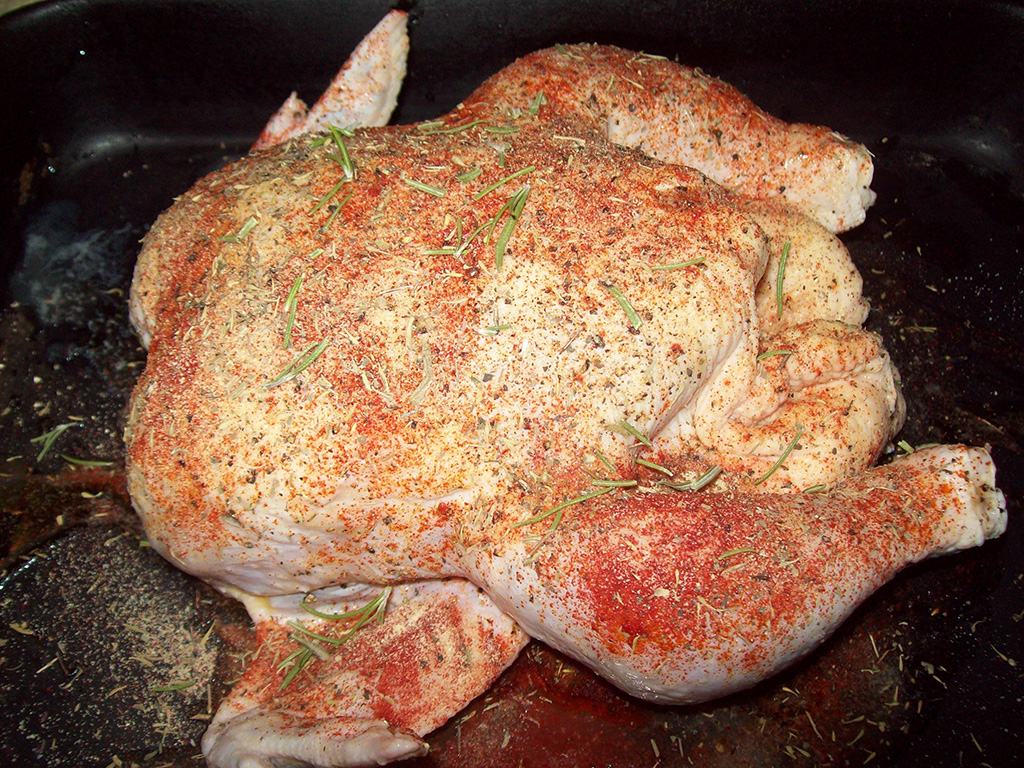
On top of the salt and pepper, add your garlic powder, spice blend, and paprika. The spice blend might seem like an annoying ingredient to keep on hand, but they come in handy for roast meats since they contain a mixture of herbs and spices that just add a generic “seasoning” taste to it. It’s technically padding, but you really should have some. Herbes de provence, which is just a generic blend of like rosemary/lavender/oregano/etc, are great but you can really add any spice blend you want since they’ll mostly blend into the rest of the flavors.
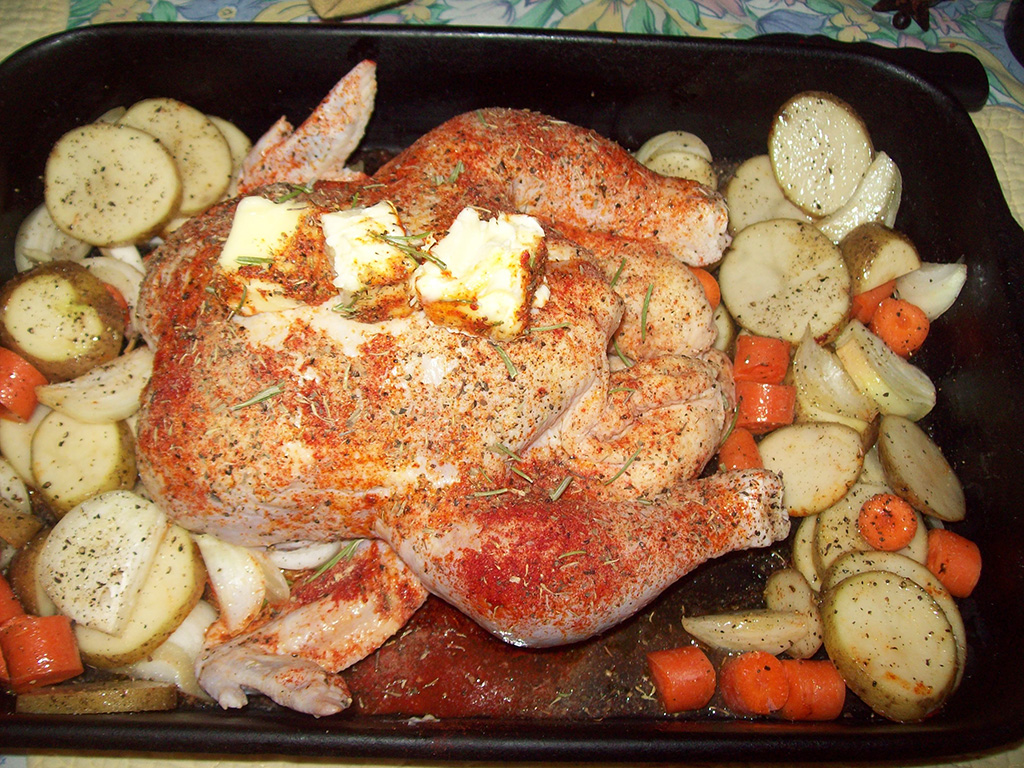
Lastly, when you’re seasoning the top of the chicken, add your fresh herbs and then just plop the butter on top to finish. Add your potatoes, onions, and carrots, drizzle them with olive oil and add a little salt and pepper to them as well.
Cooking in the Oven
Place your chicken in the oven, on the middle rack if you have racks, and get ready to play the waiting game. As mentioned, the only real downside to roast chicken is that it does take a while. A while, as in, like, at least two hours. It’s worth it though since you do get a lot of food out of it. The good news is that for like the first 40 minutes you don’t really need to do much at all.
After about 30-40 minutes have passed, your chicken should be starting to look a little bit cooked. Look at the juices in the bottom of the pan. Does it look like they’re all dried up, or close to it? If that’s the case, you can add 1 cup of chicken stock to the pan to replenish it. You can also use water, but this will water down the drippings if you plan on using them for gravy.
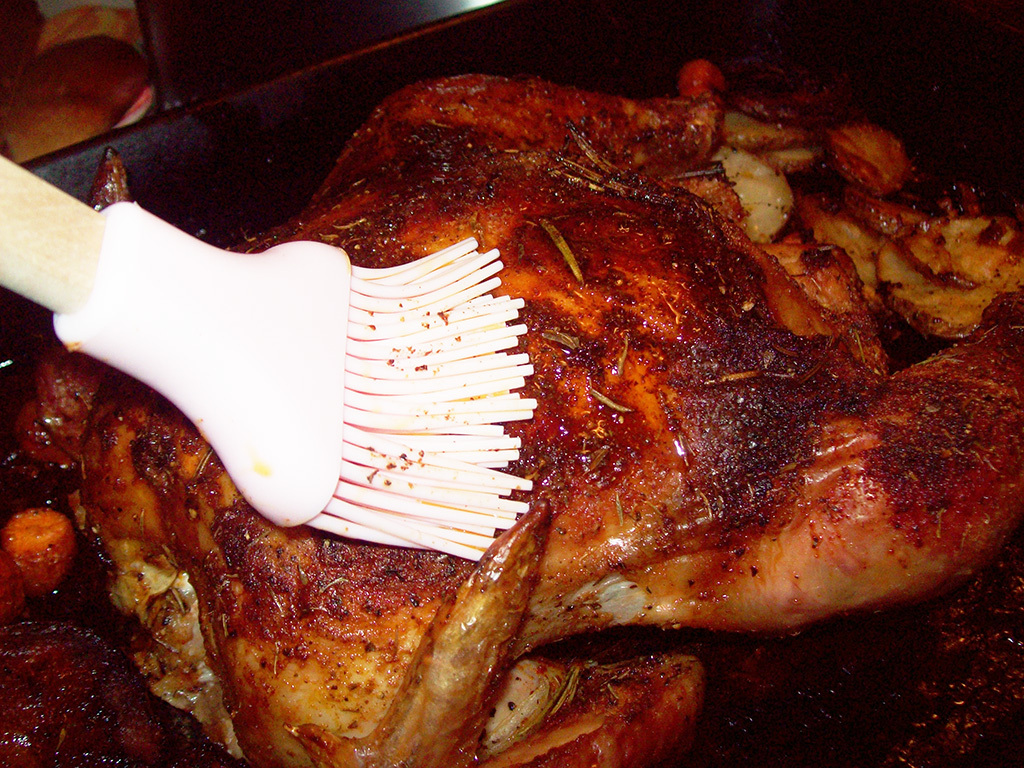
At any rate, at this point on you now begin a cycle where you check in on the chicken, baste it, stir the veggies, and walk away for another half hour. I prefer using a cooking brush to simply brush the juices from the pan onto the chicken, but you can also get away with using one of those syringe-like turkey basters to suck juice up and blast it on as well. Make sure to stir the vegetables when you do this too since the ones on the bottom will burn after a while. Repeat it every 30 minutes or so until the chicken seems done, which will probably take around two hours.
Finishing Cooking
After two hours have gone by, you can start checking if your chicken is done. There’s a couple of methods. If you have a meat thermometer, insert it into the side of the chicken near the leg, and read to see how hot it is. If it reaches 165ºF, it means your chicken is safe to eat. Additionally, many chickens from the grocer store have a “popper” installed, which looks like a small, plastic disc on the breast, like the size of a dime. The way they work is when the chicken hits a safe temperature, the popper will “pop” up, signifying that it’s done. These are usually pretty reliable, but sometimes it’s best to double-check.
The absolute best and most foolproof method to check your chicken, however, is with your own little surgical application.
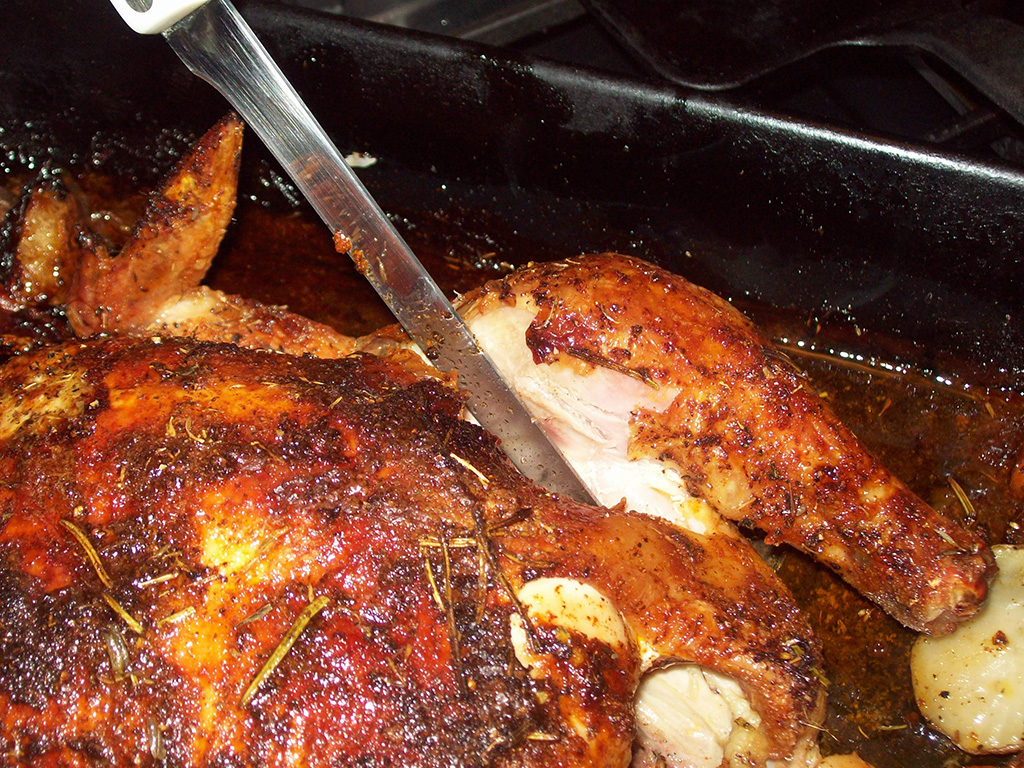
Use a knife to cut open the area between the leg and the chicken thigh. When you do this, you’ll see juices and stuff running out of the chicken. If your chicken is fully cooked, these juices are going to look clear to yellowish clear. Have a look:
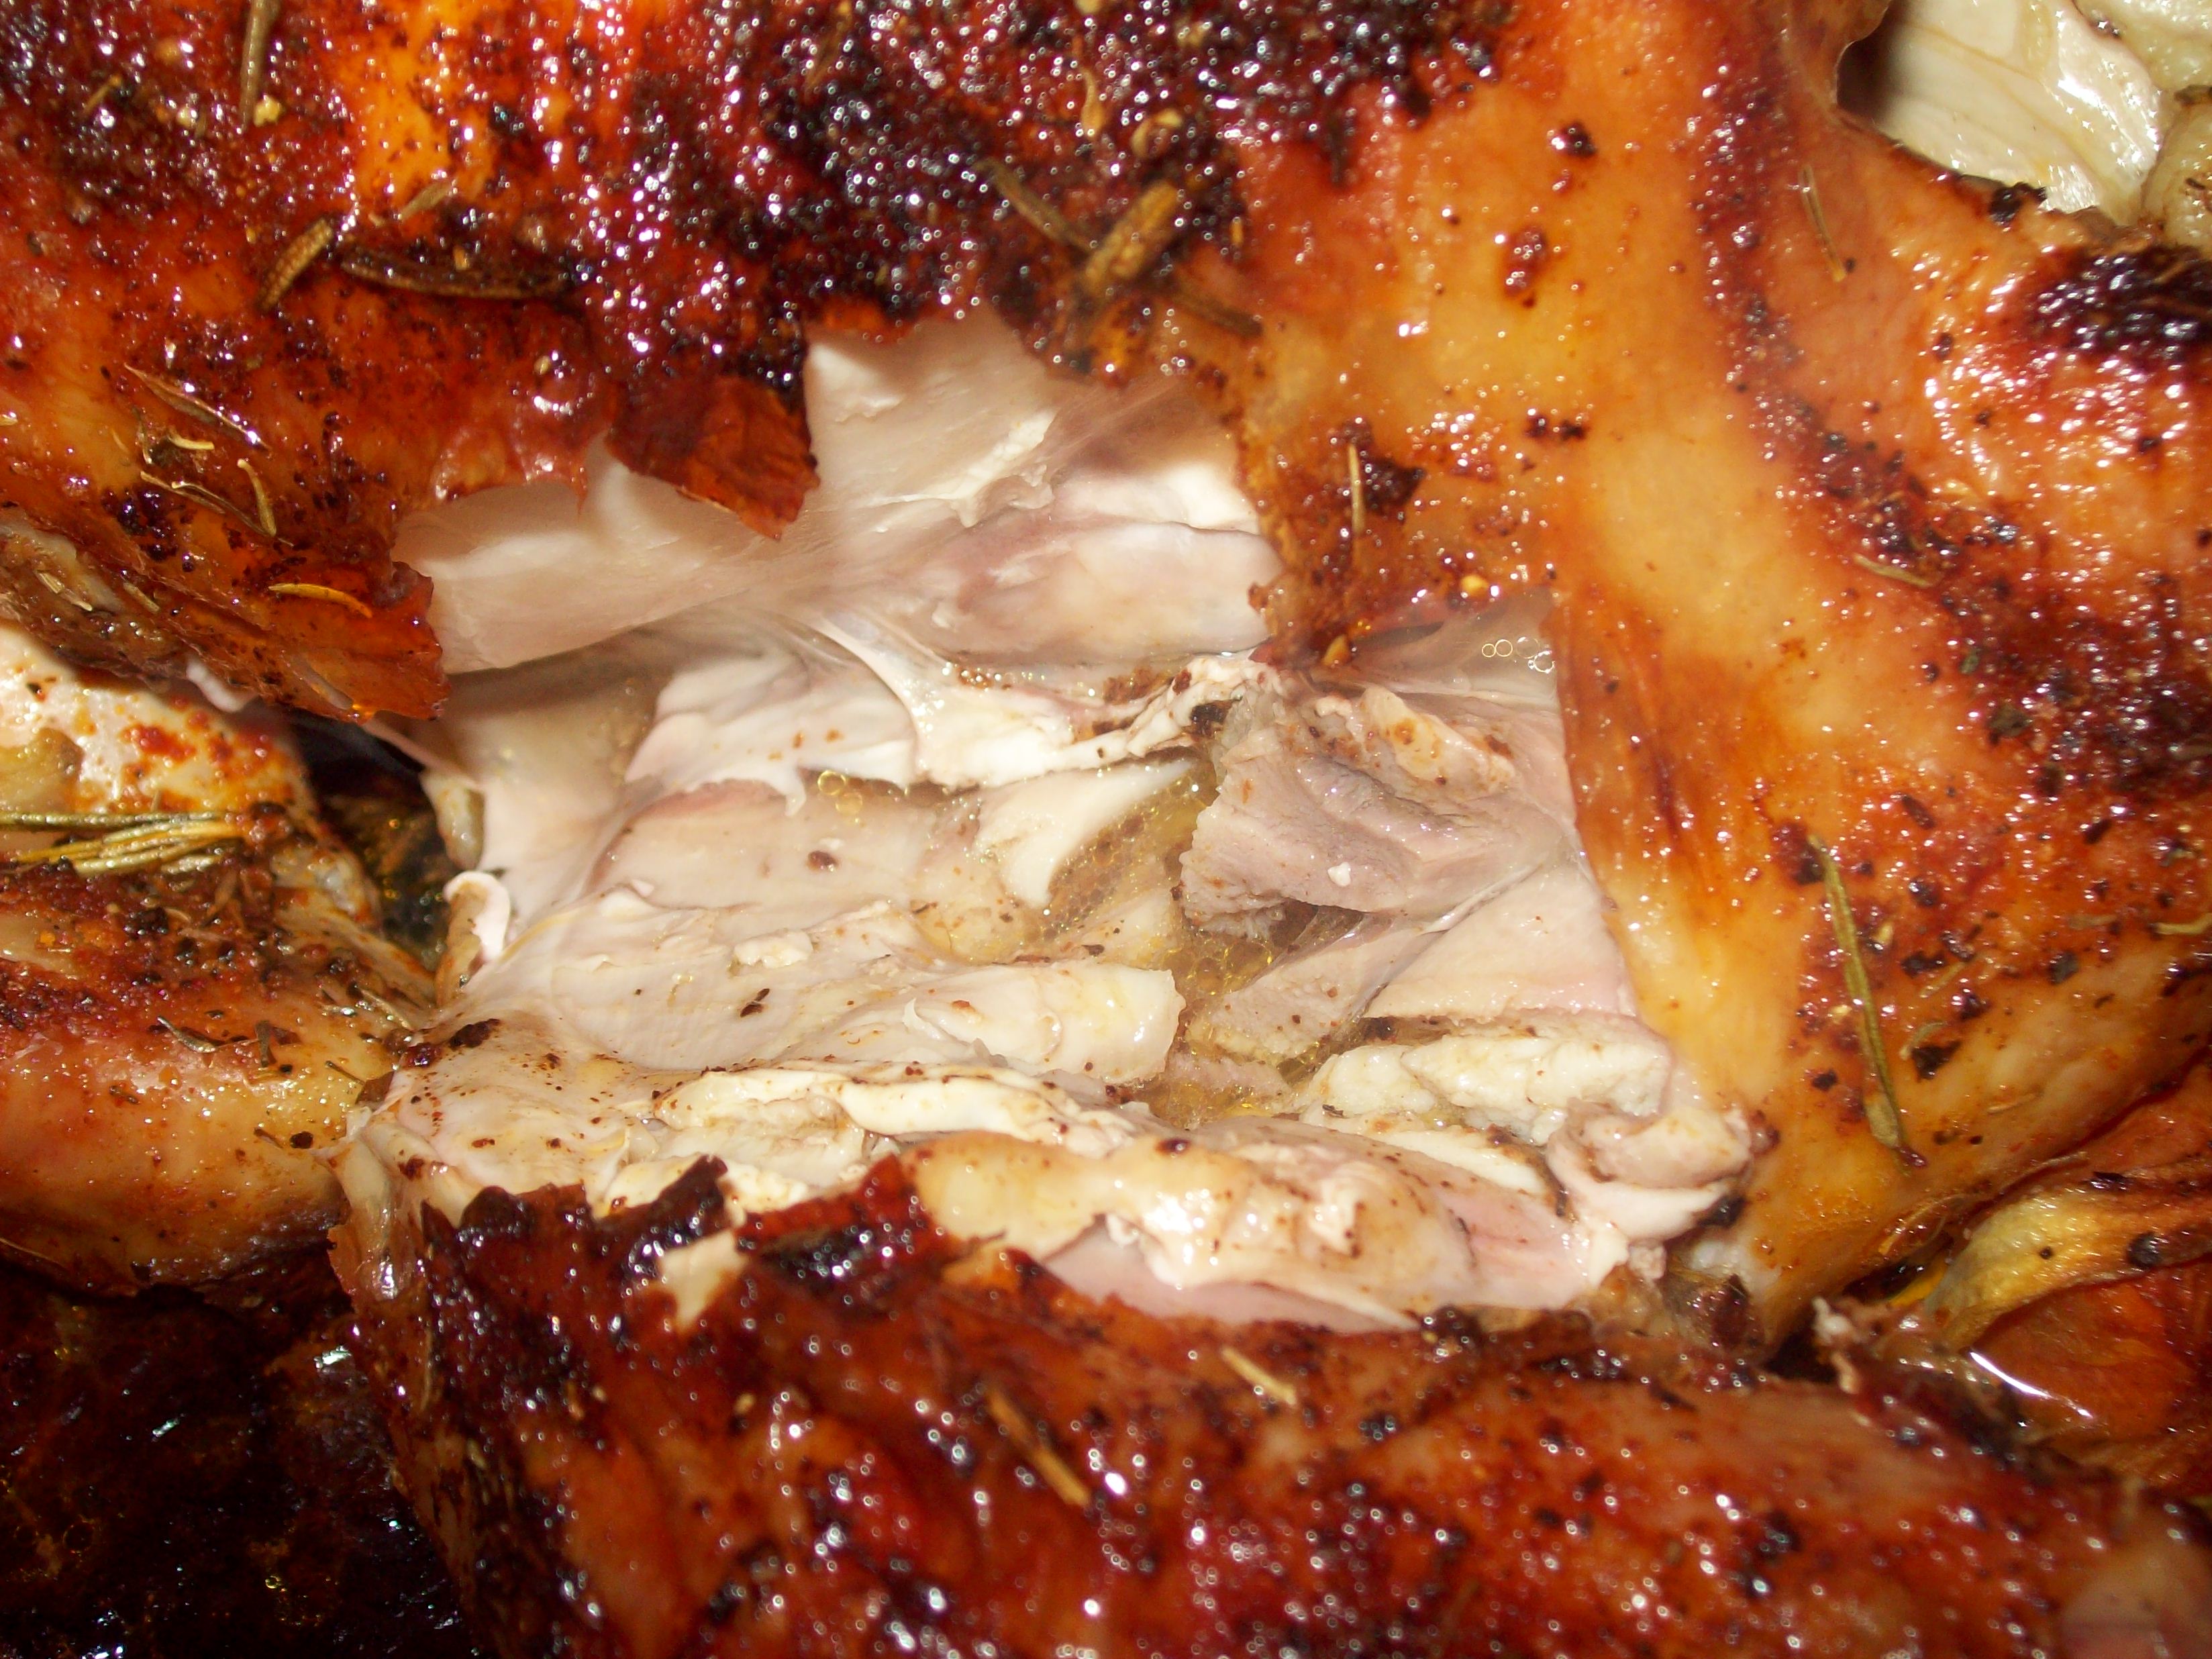
See in the bottom there? There’s oils and fats and juices and stuff. It’s clear, it almost looks like water. That means the chicken is good to go. If those juices have a tinge of pink or red to them, put the chicken back in the oven for another half hour and check again.
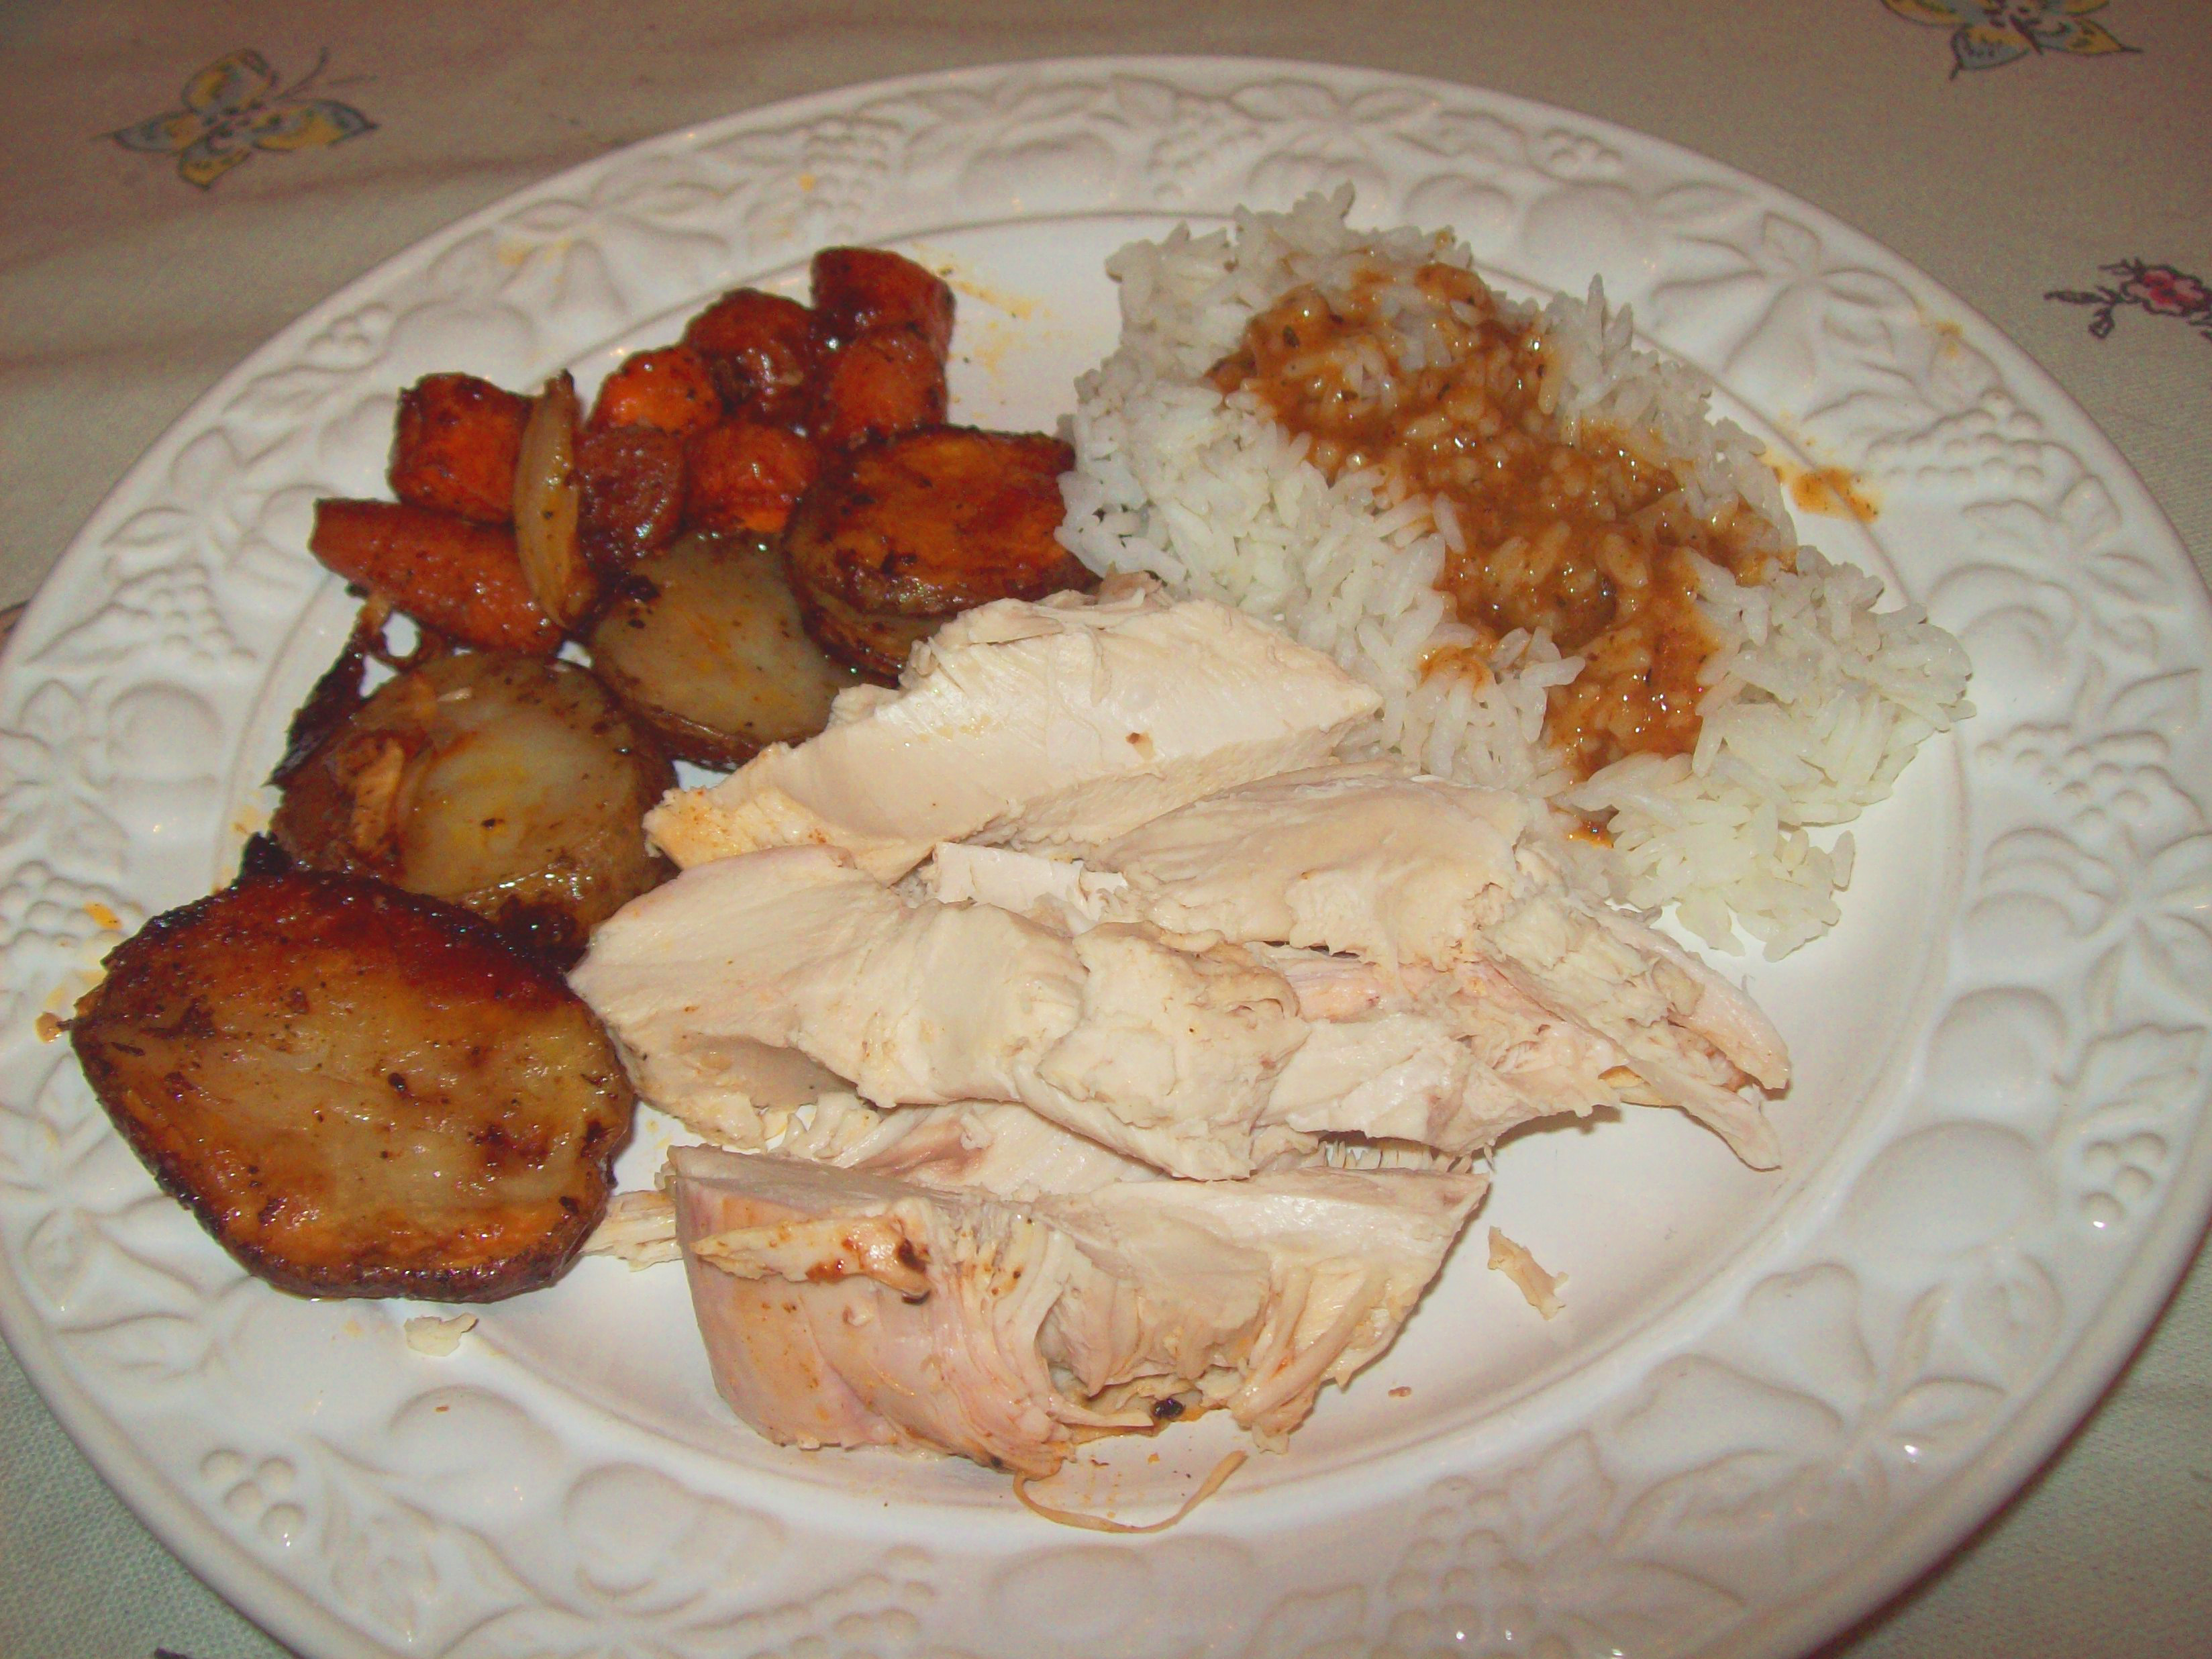
If your chicken is done, remove it from the oven and let it sit for at least 15 minutes. When it’s cool enough to handle, you can cut it up and serve it!
Step-By-Step Overview
- Set your oven to 375ºF and slice up your vegetables if you haven’t yet.
- Open your chicken in the sink and rinse it off. Remove the junk out of the inside of the chicken cavity. Place the chicken in a large pan, breast-side down.
- Drizzle olive oil and lemon juice onto the chicken. Sprinkle it with all your seasonings generously, but not so much that they pile up on the chicken.
- Flip your chicken over and repeat the seasoning, but also place your fresh herbs and butter on top of the chicken.
- Add your veggies to the pan, drizzle them with oil, and season with salt and pepper. Place the chicken in the oven and let it begin cooking.
- After about 30-40 minutes, when the chicken looks like it’s a bit cooked, check the pan. If the liquid seems like it’s drying up, add a cup of chicken broth.
- Every half hour or so, check in on the chicken. Baste it with the pan drippings and stir the vegetables around. Check it for done-ness after about 2 hours.
- To check if the chicken is done, use a meat thermometer to see if it has reached 165º. Alternately, you can cut between the leg and thigh and check if the juices in the meat are clear-colored. If they are, and there’s no pinkness, your chicken is all done.
- Remove the pan and let the chicken sit for at least 15 minutes. When it’s cool enough to handle, you can carve it up and serve.

So it seems like a long process, but really the majority of your time is spent doing nothing. Once the chicken goes into the oven, you can pretty much walk away and go do anything you want, as long as you stay close by enough to remember to check on it every half hour. While that can be annoying, it’s really worth it in the end since you get a shit-ton of food which comes in handy for leftovers and lunch later in the week. Hell, you could probably get away with eating half the chicken one night, then heating it up again for an entire second dinner on another night if you have a small family. That’s all including the fact that whole chickens for the most part are relatively cheap, considering how much food they provide. On average you can probably find most in the $5-$10 range, which is awesome since you’re gonna be getting, pfft, what, like almost 8 servings of food from them? It’s no wonder this is like the classic chicken dish.
Pro-Tips
- If your vegetables seem undercooked or kind of… “wet” when your chicken is done, you can remove the chicken and put the pan back in the oven. Set the oven to broil and let them finish cooking while you slice the chicken up. This will help them dry up and get nice and roast-y.
- If you plan on making gravy with your chicken, make sure to pour all the drippings out from your pan after removing the chicken when it’s done cooking. If you played your cards right, you’ll probably have at least 1/2 cup or even a whole cup of drippings to use for making the delicious food-nectar that is gravy.
- Be creative with your seasoning! Roast chicken can be seasoned with almost anything. A good place to try experimenting with is the juice you use in seasoning. Lemon juice works fine, but you could try using orange juice, lime juice, wine, cider, or even beer! All these will give your chicken a different zing, and you can do even more by using different spices sprinkled on top.
Posted on April 4, 2016, in Food 101 and tagged chicken, Delicious, healthy, kitchen essentials, On the cheap, recipes, smells. Bookmark the permalink. Leave a comment.


Leave a comment
Comments 0